Rustoleum Cabinet Top Coat : Rust-Oleum Cabinet Transformations / Shipped with usps priority mail.. The finish on the product is also lacking. I read so many reviews saying that the protective top coat that came with the kit was crappy and to buy some polyurethane to use instead. The bond coat is the step that is matched to the various color options in your kit (there is a dark kit and a light kit, with 35 colors to choose from.glaze doubles your finish options, giving you a total of 70 color choices). I recommend a foam brush or a foam roller to get the smoothest finish possible and to reach all of the little nooks and crannies. First of all, it was very time consuming and secondly the top coat was a huge disappointment.
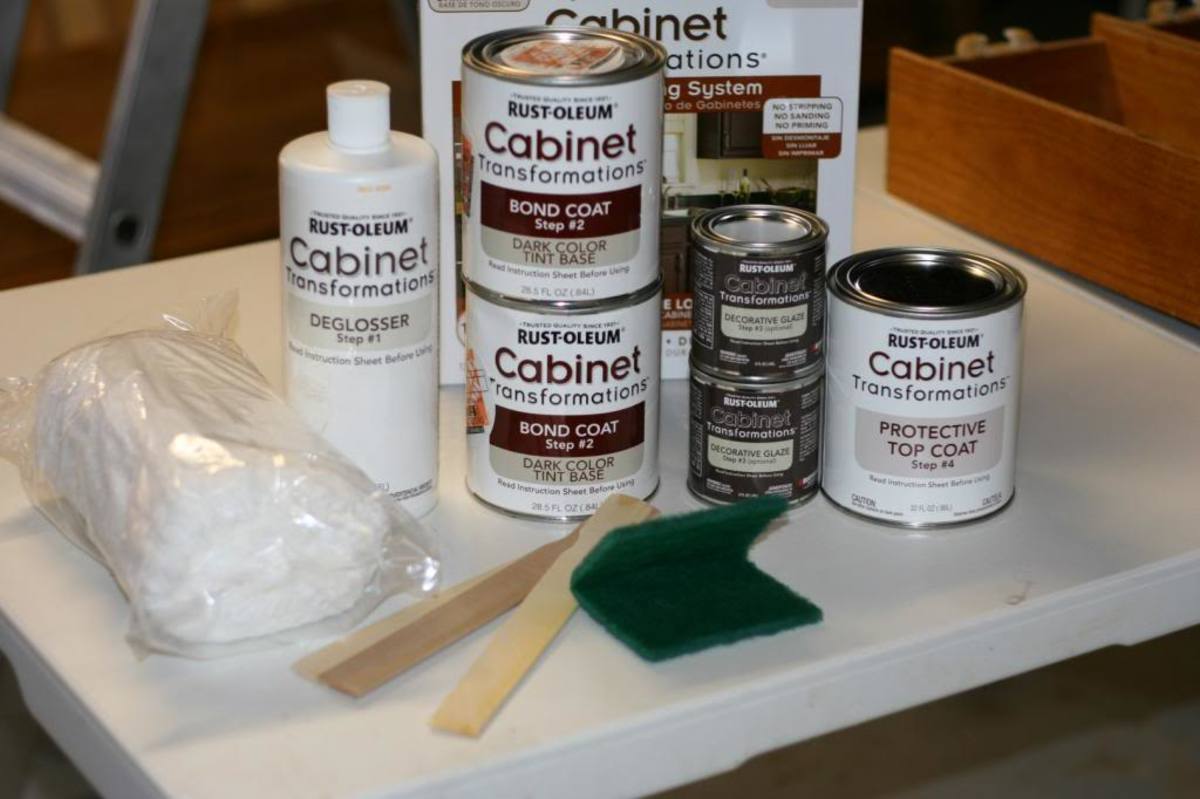
For interior use on kitchen cabinets, bathroom vanities and other furniture. Items needed but not included (3) 2 synthetic paint brushes. However, i'm planning to go back and brush on the top coat to just the top of the piece, where i place decorative items. Here's what's included in the box: This is for one can.
My dresser with the base coat on, using the Rustoleum ... from i.pinimg.com I used rustoleum chalked chalk paint on this pale blue chalk painted cabinet but opted not to apply the topcoat because this piece is more decorative and doesn't get daily use; I recommend a foam brush or a foam roller to get the smoothest finish possible and to reach all of the little nooks and crannies. The bond coat is the solid color, and it's probably an acrylic latex paint. Unfortunately, i did use up all of my top coat, but i wanted to redo the areas that had yellowed and crackled. First of all, it was very time consuming and secondly the top coat was a huge disappointment. I topped the rustoleum product with another clear coat of water based product while i was experimenting with there product. Cabinet transformations is a process designed to refinish worn or damaged cabinets in three simple steps. Shipped with usps priority mail.
To spray the protective top coat, reduce with up to 10% water and use a hvlp sprayer at 35psi.
5.0 out of 5 stars 1. Will check with rustoleum also. To spray the bond coat, reduce with up to 30% water and use a hvlp sprayer at 35psi. We setup the cabinet doors in the garage on some sawhorses and started with the backsides. The small kit costs $100 and covers 100 square feet, enough for the average home's 17 cabinets. It is available from home improvement and craft stores. Let dry and follow manufacturer's instructions regarding when the cabinets can be used/cleaned; Unfortunately, i did use up all of my top coat, but i wanted to redo the areas that had yellowed and crackled. I read so many reviews saying that the protective top coat that came with the kit was crappy and to buy some polyurethane to use instead. I'll look into using an alternative high quality top coat. And the finish top coat that is a sealer. The kit color i'm using is espresso. This part freaked me out the most.
I haven't done the protective top coat yet. 4.6 out of 5 stars 1,843. Unfortunately, i did use up all of my top coat, but i wanted to redo the areas that had yellowed and crackled. Revolutionary formula is easy to use and requires no stripping, sanding or priming. In the year since i used the rustoleum cabinet transformations kit to refinish the cabinets, i've recommended it to a number of friends.
Great Concept Rustoleum Cabinet Top Coat - rssmix.info from rssmix.info We chose to try rustoleum cabinet transformations because it was relatively inexpensive (~$75) and i knew that it was appropriate for the surface of my cabinets. I painted my cabinets with the espresso color and at the beginning turned out reasonable. Give your projects new life with a unique finish. When i went to my local home depot to pick up more suppli. The top coat will protect it from scratches. We setup the cabinet doors in the garage on some sawhorses and started with the backsides. Cabinet transformations is a process designed to refinish worn or damaged cabinets in three simple steps. I read so many reviews saying that the protective top coat that came with the kit was crappy and to buy some polyurethane to use instead.
First of all, it was very time consuming and secondly the top coat was a huge disappointment.
And the finish top coat that is a sealer. From what i've been reading, the top coat is an issue on the dark paint colors. 5.0 out of 5 stars 1. The bond coat is the step that is matched to the various color options in your kit (there is a dark kit and a light kit, with 35 colors to choose from.glaze doubles your finish options, giving you a total of 70 color choices). Protective top coat is fully cured. The bond coat is the solid color, and it's probably an acrylic latex paint. The top coat is a clear layer. Cabinet transformations is a process designed to refinish worn or damaged cabinets in three simple steps. You may spray cabinet transformations® only when you do not intend to use decorative glaze in the system. Spray a gloss topcoat or any other spray topcoat on in light coats. When i went to my local home depot to pick up more suppli. Nicks in rustoleum cabinet transformations finish. We used it first in our bathroom as a test and it went alright, the final top coat wasn't to be desired but the streaks weren't so obvious.
We applied the bond coat with the grain of the wood. This is for one can. To spray the bond coat, reduce with up to 30% water and use a hvlp sprayer at 35psi. Unfortunately, i did use up all of my top coat, but i wanted to redo the areas that had yellowed and crackled. Like we said before, be careful while applying the top coat.
How to Paint Cabinets Using Rustoleum Cabinet ... from usercontent1.hubstatic.com The kit color i'm using is espresso. I recommend a foam brush or a foam roller to get the smoothest finish possible and to reach all of the little nooks and crannies. We used it first in our bathroom as a test and it went alright, the final top coat wasn't to be desired but the streaks weren't so obvious. To spray the protective top coat, reduce with up to 10% water and use a hvlp sprayer at 35psi. And the finish top coat that is a sealer. Here's what's included in the box: Revolutionary formula is easy to use and requires no stripping, sanding or priming. Cabinet transformations is a process designed to refinish worn or damaged cabinets in three simple steps.
The finish on the product is also lacking.
When you buy the rustoleum transformation kit it comes with almost everything you need to get the job done right. Amazon's choice for rustoleum protective top coat. We applied the bond coat with the grain of the wood. The small kit costs $100 and covers 100 square feet, enough for the average home's 17 cabinets. The bond coat is the solid color, and it's probably an acrylic latex paint. I applied the protective top coat to the cabinet frames and the backs of the doors and let those dry for two hours. This part freaked me out the most. Cabinet transformations is a process designed to refinish worn or damaged cabinets in three simple steps. I tried the rustoleum cabinet transformations this past weekend and the project was a disaster. Avoid repeat application in an area or it turns yellow after drying. 4.6 out of 5 stars 1,843. The finish on the product is also lacking. The bond coat is the step that is matched to the various color options in your kit (there is a dark kit and a light kit, with 35 colors to choose from.glaze doubles your finish options, giving you a total of 70 color choices).